Nov 042018


These are the dimensions of my wooden jack adapter. Ensure that the two vertical posts are exactly this size and that you use solid wood with the grain running vertically. Not shown in this photo I have added two metal straps to the top of the larger post so that these help to locate it and hold it in place on the kickstand mounting. The chamfered top to the smaller post allows it to sit in the depression in the kickstand mounting.

Nov 042016
 

Last week my Honda Valkyrie turned 20 years old and so I decided to give her a birthday treat of a makeover.

The first change, as my wife no longer rides with me, was remove the rack and the pillion seat and backrest.

New Look

The chrome on the velocity stacks had started to peel, I tried having them chrome powder coated and I was very disappointed with the result it was more like a dark grey colour rather than shiny silver. As a result I delivered them to my local painter at Airbrush Shack who did the airbrushing on my front mudguard and helmet. Cliff did a great job on them like he always does. Whilst he was doing the velocity stacks I got him to airbrush the cam end covers black with yellow dragons.

Cam covers

The cam belt cover chrome was in poor condition when I rebuilt the bike and so I had it stripped and then polished but it was a pain to keep clean and so I decided to let Cliff do his magic on this too and it is now gloss black with yellow stripes.

belt cover

I never have liked the large front indicators mounted on the forks and had always liked the handle bar ones mounted on some Harley’s. I found some on eBay that were suitable and then ordered handlebar clamp mounts from another eBay supplier and now have the turn signals mounted on the handlebars below the brake and clutch reservoirs.

indicators

To finish up the makeover I removed the speedo and rev counter and replaced them with a digital gauge from Koso which has all the important functions on it, including fuel level should I buy an interstate tank.digital speedo

That is all the work for now but given the new front end look I will be on the hunt for a VTX headlight. Whilst Cliff was doing the painting for me I got him to paint my spare wheels black and yellow too and so when I need new Avon’s I will put the painted wheels on too.


Apr 232016
 

I found a set of HardKrome exhausts advertised on the UK Valkyrie Riders Cruiser Club forum for sale. I agreed a price with the seller and arranged to have them picked up for me from him in the UK by one of the man-in-a-van transport services, only to be let down at the last minute. Luckily I found another company who were in the area and they picked them up for me and transported them to Spain. Steve, the seller, had packaged them exceptionally well and they arrived undamaged.

I thought I would take a chance and fit them without changing the exhaust gaskets. Mistake. They were blowing and so I then had to order exhaust gaskets from the local Honda dealers. They took 5 days to get here. With the help of a friend, Ken, I fitted them this week. They sound great. The only downside is that my LeatherLyke bags no longer fit, but I think the Valk looks better without them with the new pipes.

HardKrome pipes

Valk


Nov 222012
 

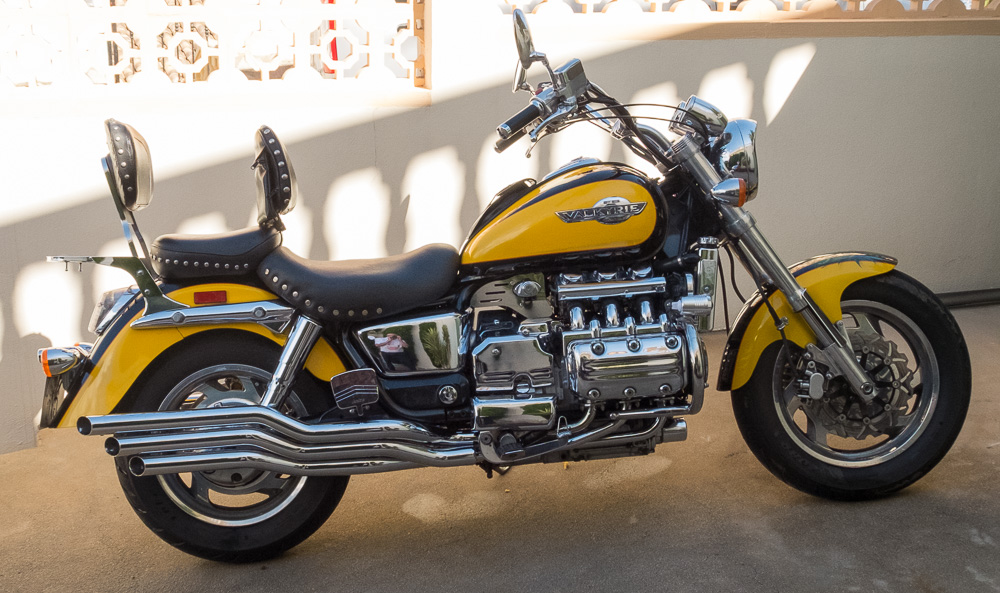
One of the things that I have never particularly liked about the Valkyrie is the “heavy” front mudguard.

I decided I wanted a smaller mudguard that was trimmed front and rear and in profile. The standard steel mudguard is fairly thin metal with a rolled outer edge. As a result I decided not to try and modify the standard steel mudguard. I bought a fibreglass replica mudguard from a company in the UK from eBay.

This fibreglass mudguard was very well made and finished with no flash lines.  The outside was finished in white gel-coat and the inside was  matt black. There were captive nuts already fitted for the mounting points and brake line retaining clip. The holes for the fork shields were marked but not drilled.

A friend from my local bike club is an airbrush artist and I spoke with him about this project and getting some airbrushing done. He readily agreed to help and in fact he ended up doing all the trimming of the fibreglass, the painting in standard colours, pin striping and airbrushing. My thanks to Cliff of CJ Creations for all his hard work.

The first job was to mark the original mudguard where I wanted it cut. This we did with some red tape.

The fibreglass mudguard was then trimmed to match this shape.

It was then painted standard ‘Bumble Bee’ colours

Then pin-striped by hand

Cliff then started the airbrushing first masking the mudguard and putting the black and grey paint

He then started adding colour and nearly finished

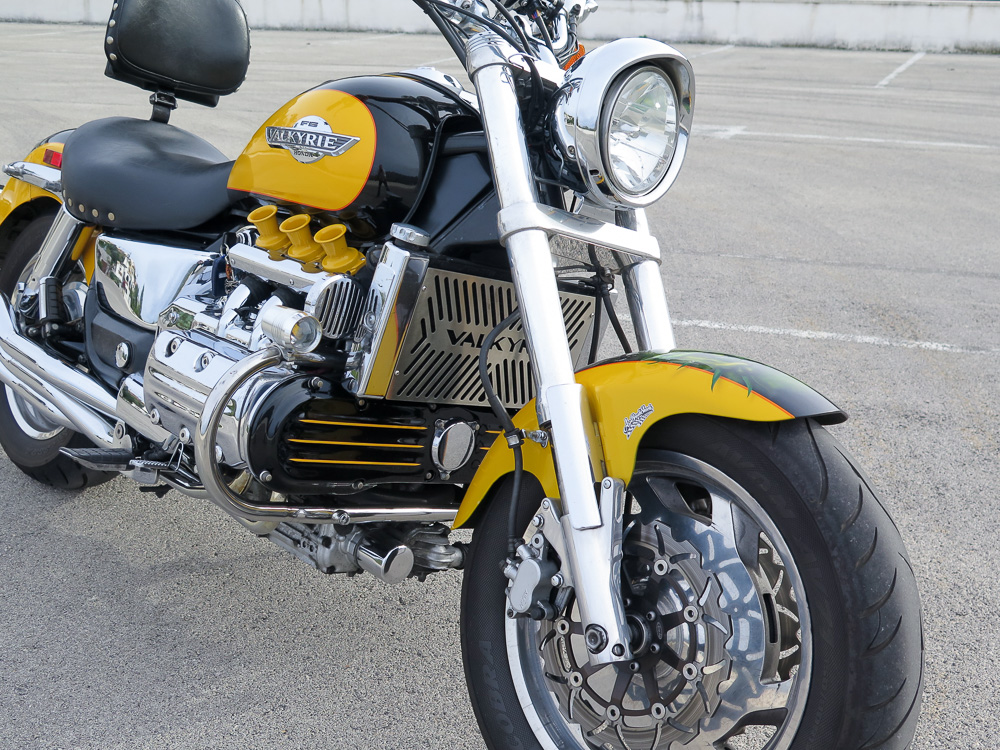
Finished with the flames and ghosting added and ready for fitting

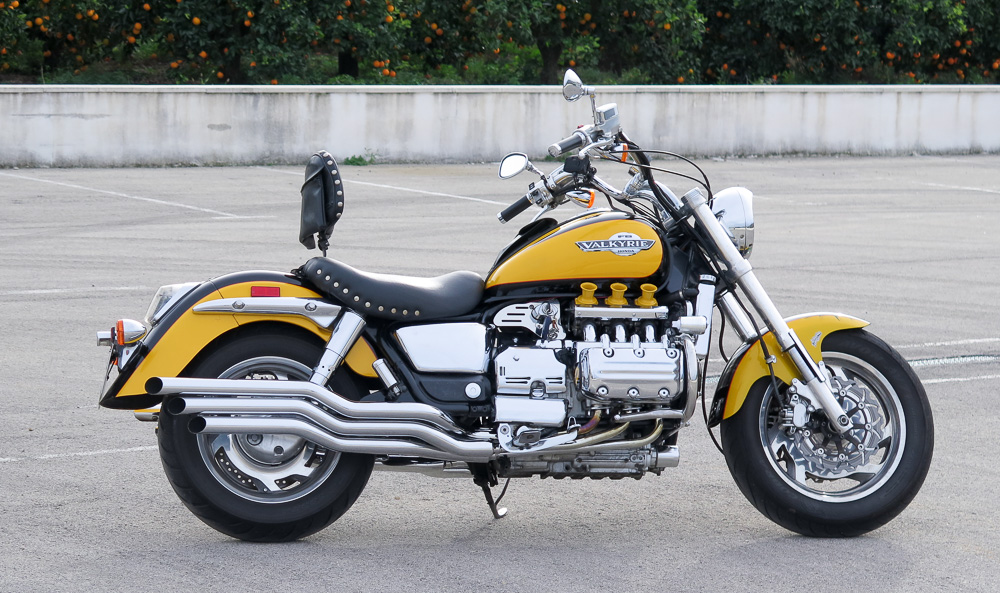
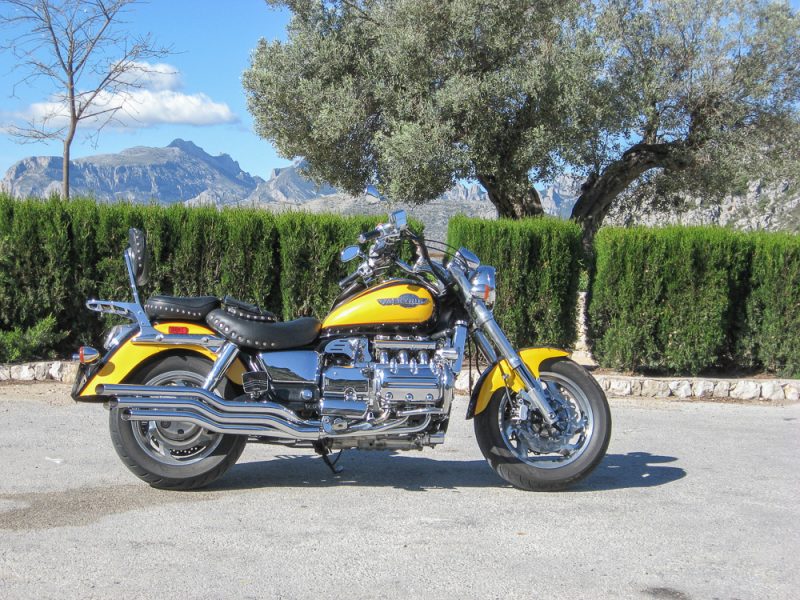
Mounted and ready for use.

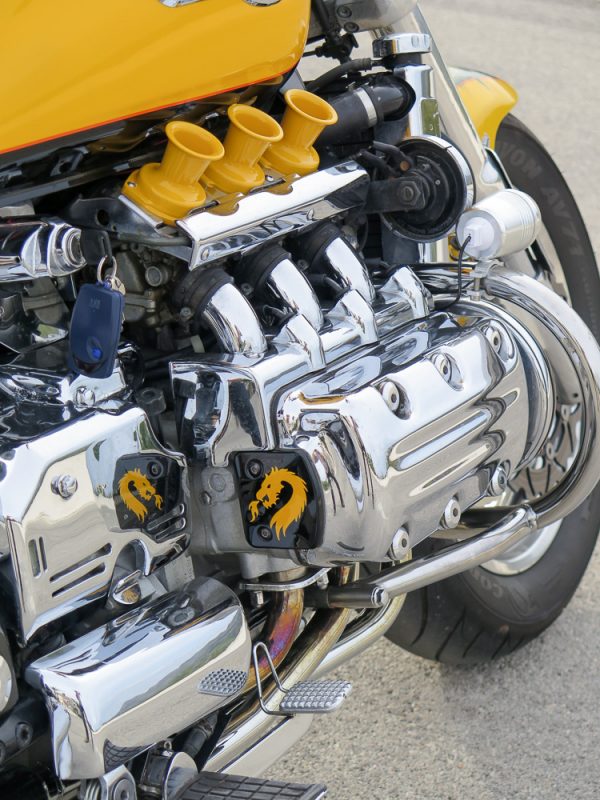
The Dragon (Not the best photo as it is difficult due to the high gloss and reflections I will try and get a better one.)

My thanks once again to Cliff for his superb airbrushing.

Jun 032010
 

This will probably be my last post on this site. I have just been adding some more chrome and adding stiffeners to the leather saddlebags washing and polishing over the last few weeks as well as two trips away. Today I started the Spanish registration process which should hopefully be finished late next week with the issuing of the Spanish Registration plates. Over the last two days I have clocked up 50 miles (not a lot by ‘iron butt’ standards I know) but this is just to ensure that everything has settled down and there are no rattles or loose bits to worry about. To date nothing has caused a problem. I have added some photos that I took today to the ‘finished’ album.

If I can find another Valkyrie ‘wreck’ that needs restoration I have some different thoughts about how I would do a re-build next time that would be far more radical than this rebuild. So if you hear of a cheap Valkyrie restoration project please let me know.

Apr 242010
 

Monday: I sorted out the no left rear indicator it was an unplugged cable under the right side panel. I adjusted the foot brake light switch and now that is not on all the time. I fitted the right side transmission cover and the left and right side frame covers that I got from Andy in Germany. I definitely need to get a left side cover too. I fitted the side covers being careful not to break the tabs. I fitted a bracket to hold the air shock top up connector under the seat and I fitted the drivers back rest. Only got the auxiliary wiring to do in the headlight now and to fit the starter saver relay in the head light.

Tuesday: Fitted the auxiliary switch panel to the handlebars. I finished the wiring for the starter saver relay and fitted that inside the headlight shell. Wired the hazards lights and spot light circuitry up inside the headlight. The hazards come on but don’t flash, this is probably my fault for fitting diodes that I didn’t need to to the switch. I need to remove these and try again. I fitted the headlamp. Checked all the wiring and other than the hazard light problem everything is working as it should. I just need to connect the led in the new switch panel to the alarm system as the location of the existing led is useless. The indicator warning light is nice and bright after doing the ‘rattlebars’ diode modification. I just need a bit of help to do the measuring to set up the air shocks and refit the saddlebags and everything is done. I can’t fit the spot lights until after I have had the bike tested as you are not allowed to have more than two front white lights on a bike, most cruisers have light bars fitted but they are removed for the biannual test. I have packaged up the triple exhaust tips and the windscreen mounts to take to the UK when I next go to see if I can get them chrome powder coated as they are too expensive to get re-chromed here.

Friday: I adjusted the gear lever as it was too close to the foot peg. I wired up the new LED warning light for the alarm so at least I can now see whether it is flashing or not. I removed the diodes from the hazard light wiring but just as I completed removing them it started to rain and so that put paid to any more trouble shooting for today.

Saturday: Checked out all the wiring for the hazard lights and everything is as it should be so I suspect that I have a faulty flasher unit. I fitted the saddlebags and adjusted the drivers back rest. I removed the extra reflectors from the swing arm mounts and I fitted the mounting brackets for the driving lights so that it will be a quick job to fit them once the bike has been inspected. Pumped up the air shocks and went for a little ride round the block and everything is fine. So that’s it just test and register and I am on the road.

Apr 172010
 

Monday: A Much better day today. After some advice from Marty and Alan on the main VRCC board an reading all the other posts about refitting the air box I finally got it on. I made a special tool to ensure the rear of the tube was properly seated and with a little WD40 and a ratchet strap I got it seated properly. Fitted the new air cleaner and buttoned it all down. I then fitted the petrol tank and found that the auxiliary power socket that I fitted to the front left of the frame was partially obscured by the tank and so I had to take it off again. I will have to re-drill the mounting plate and put it back on before the tank can be mounted. I refilled the cooling system with new anti freeze mix and called it a day. I am still waiting for the delivery of the exhaust gaskets, hopefully they will be here tomorrow.

Tuesday: The exhaust gaskets arrived with the lunch time post delivery. Not a lot of point though as it is pouring with rain. Raining all day Wednesday too.

Thursday: Another good day. I refitted the side neck cover and then the petrol tank. I had to shorten the main petrol pipe some more due to the fitting of the electric shut off valve but got it back on and all back together without needing any help. I fitted the rear brake calliper, the left side exhaust and the prop stand. I then bled the front and back brakes and the clutch. The left side engine crash bar seems to be a little out of shape and I will need some help to get that bolted up. I can’t re-fit the right side exhaust until I get the bike down off the lift as it is in the way. I fitted the new alternator chrome cover and so now the left side is completely finished.

Friday: A good day and a bad day. With the help of a friend I got the Valk off the lift. I then installed the right side exhaust and the two engine crash bars. Checked that the brakes were still OK with plenty of pressure and they were. I bounced the front suspension and then torqued the front axle. I then checked everything over for loose bolts etc and didn’t find any. So I took a chance and connected the battery and turned on the petrol. Engaged the choke and started turning the engine over. It coughed twice and then started right up, not bad considering that it last ran in October last year. I topped the radiator up with the engine running as directed in the workshop manual. I then noticed a small puddle developing underneath the bike. Turned if off and smelt the liquid in the puddle and found that it was petrol. Looking underneath the airbox I found that the petrol was leaking from the pipe attached to the electric shut off valve. There was no choice but to remove the tank and the airbox again. The airbox came out much easier than it went in. I found that the worm drive on one of the hose clips on the valve had failed and it wasn’t tight. Tidied up and took a trip to the local car accessory shop for four new clips for the fuel line. Oh how I wish I had bought them before, hindsight is a wonderful thing. So just got to refit the valve and the airbox and the tank and it will be there.

Saturday: Great day today. I reinstalled the shut off valve with new clips. I then refitted the airbox. It only took about an hour this time to get it in better than before. Definitely not a job that I want to tackle too often. I got the tank back on and checked everything over again. Connected the battery engaged the choke and it started as soon as I touched the button. Let it warm up ad then went for a slow ride in 1st and 2nd gear around the corner to an empty car park. I had a play there for about 5 minutes and then rode home. I got a couple of clunks from the air shocks as they haven’t got any air in at the moment.  Just change the oils, some final wiring to do hazard lights and spot lights, the brake light is on all the time so the switch must need adjusting and then do the measuring for the air shocks and it will be ready for testing and re-registering for use here in Spain.

A really great week in the end and hopefully there won’t be many more entries on the blog about the rebuild the rest will be about using it.

Apr 102010
 

Monday: Today was one of those days when I had a chance to ride with friends in the sun  and declined  as I, hopefully,  only have a couple of hours work left to do before the rebuild is finished.

First job re-fit the exhausts. Easy get the new set of gaskets out OOPS too big won’t go in the opening in the head, must be the wrong one. B….. Fleabay. Now I will have to wait at least a week whilst I get some from the stealer.

Second job fit the kick stand. Can’t get it on as the jack is in the way, have to wait till I can get an assistant and re-position the jack.

Third job re-route the front brake lines and the throttle cables as I fitted them wrongly  :'( Good job I saw a friends Valk yesterday and realised. That went off without too much of a hitch.

Fourth job re-bleed the front brakes. Ran out of new brake fluid and all the shops shut as it is a public holiday.

Fifth job fit the airbox. Thanks to everyone who says that this is a PITA job it certainly is. Got the airbox in between the frame rails relatively easily after a lot of effort and about 20 minutes pushing and pulling I got the small pipes refitted and  the rear two hoses on to the carbs. After about another 40 minutes of struggling to get the centre and front ones on I called it a day.

Today was quite clearly a day when I should have gone riding rather than working on the Valk.

Saturday: Nothing done all week waiting for the exhaust gaskets to arrive. I decided to have another go at the airbox.  First off I removed it again. Checked the location of the wiring and repositioned it just to make sure there was enough room for the airbox to drop down fully. I tried removing the rear carburettor brace plate as suggested on the VRCC forum to get my hand in under the airbox.  I got the nuts off the plate and got it loose but could not manoevre it out between the carbs and the engine hangers so gave up and put it back. I tried pushing pulling swearing and in the end had managed to get one of the rear tubes correctly lined up. I was getting ready to hit it with a hammer but decided not to and so have left it until next week when I will have a go with the ratchet strap method.

A really annoying, frustrating unproductive week this week and I am so close.

Apr 022010
 

Monday: A red letter day I had a three hour round trip this morning to go and collect the parts back from being polished or re-plated. The quality of the polishers work is exceptional and I am really pleased with what he did. They cost a bit more than estimate due to the state of the wheels and the need to de-mount the tyres. After lunch with a little help from my wife I mounted the forks the front mudguard, the fork deflectors and the brake hose brackets. I got some of the wiring in to the headlight shell and re-connected and fitted the rear brake clevis pin. I found whilst fitting the front mudguard that two of the bolts had been replaced with longer ones to cater for the chrome front trim, as this was beyond repair and not being refitted I had to go and buy a couple more allen headed bolts. Whilst there I bought a set of replacement wheel bearings as the existing ones are full of crud following the polishing of the rims.

This weeks photos are here

Tuesday: Fitted the new bolts in the front mudguard and then had to remove the radiator to fit the timing belt cover. Torqued up the top new triple tree nut and then mounted the handlebars. Refitted the brake and clutch master cylinders and the control switches. Reconnected all the wiring inside the headlamp. Fitted the new mirrors and made a bracket to support the rear shocker air line connector. Took the wheels off to the local bike shop for him to press the old bearings out for me and I found that the rear wheel had about half a cup of water in it and so the spacer tube and the bearings were quite rusty. So more cleaning to do before I can refit the bearings.

Thursday: Cleaned the bearing pockets and installed the new bearings in both wheels and greased the seals and fitted the brake discs. Mounted the front wheel, front callipers and the brake hoses. I fitted the lower triple tree cover that I got from Andy in Germany. It looks great.

I then removed the rear calliper for cleaning. I was unable to bleed the front brakes as I have mislaid the new copper washers to seal the brake lines so I will have to find them or buy some new ones.

Friday: Found the copper washers so I can fit the front brake and clutch lines properly. I stripped and cleaned the rear brake calliper and the mounting plate. Then I went and worked on the Valk and fitted the copper washers on the lines, adjusted the new throttle cables and fitted the throttle runner covers. I then bled both the clutch and the front brakes. Had a go at fitting the final drive and was struggling to get it lined up and so gave it best. Went home for lunch. After lunch tried again to fit the final drive after I read up on how to do it on the main VRCC forum. I still couldn’t get it lined up and in and so after about an hour of trying I gave up and rang a friend Ken. He came round to give me a hand and after about 15 minutes we finally managed to get it all lined up and in. Then fitted the rear wheel and torqued everything up. Fitted the rear foot rests and their mounting plates and decided to call it quits for the day. In fact I am going to have a weekend off and so it will be next week before I get finished. So that’s it for this week

Mar 272010
 

Monday spares still not in so I can’t re-install the final drive. Tuesday spares still not arrived polishing finished but plating not ready until Friday but due to other commitments I won’t be able to collect it all until Monday morning. Hopefully the new bolts will be here tomorrow so at least I can do a few bits prior to the major works of next week. Finally got the new studs and bolts for the final drive late Wednesday morning. Fitted them but noticed that the spraying of the final drive wasn’t very good so rubbed it down again ready for respraying. Friday afternoon confirmed that all parts ready for collection next Monday. So a very quiet week, hopefully next week will see the aggressive installation of of the polished and plated pieces back on the Valk.

Mar 192010
 

Still waiting for the parts from Honda Alicante and from the plating and polishing. They are due on Thursday but as Friday and Saturday are public holidays I don’t expect to get anything this week.

All parts now due on Monday next so that’s it for this week other than due to a mishap with my Shadow last Sunday I have some repair work and parts to do to that too.

Mar 192010
 

Monday: Started the week off well raining, wet and cold so there was no way I could work in the car-port today. I did some more work on the final drive, another coat of paint and cleaned the large black seal that bolts around the outside of the drive unit. When I removed the drive I found that the four bolts came undone and took the studs with them. I was unable to get the nuts off the studs so this afternoon I ordered new studs and nuts and the clevis pin for the rear brakes from the local bike shop. Hopefully they should all be here this week. I then did some more work on the switch housing for the auxiliary switches. I managed to snap a 4mm tap as I was trying to tap the holes in the brackets that I had made up to hold the faceplate in the housing. I now need to replace the tap but I have now made two new brackets in aluminium rather than steel. I have also found some 3mm pan head bolts so I can frill and tap these new brackets for the smaller bolts. I also polished the filler nut on the drive housing and fitted a new vent cap as the old one was rusty and pitted.

Due to the bad weather and the lack of anything I can do until the parts come back from plating and polishing that was it for this week.

Mar 062010
 

On the home straight now as I am starting to put more back on my Bumble Bee than I am taking off.

Monday: I started by refitting the radiator and actually fitting a second bottom mounting nut as it was missing when I removed the radiator. I fitted the end plates, new grill and the new radiator cap. I haven’t re-filled the system yet as I don’t want the bottom hose in the way when I refit the cam belt cover when I get it back from the polisher. I then refitted the triple trees. What a pain in the a.. job that was trying to get the lock nut lined up with the tab washer without moving the bottom nut and affecting the preload. After about 15 attempts I finally got it on and locked in place. I refitted the headlight shell and also fitted the remaining screws in the carburettor covers after I had shortened them. I also had a poke around in the wiring and re-routed the alarm wires so that tomorrow I can fit the auxiliary fuse box and do the additional wiring that I need. Hopefully the weather forecast for the rain for the rest of the week is wrong.

Tuesday: Ran conduit up inside the frame for the additional wiring. I fitted the auxiliary fuse box that I got from the breakers yard in the UK. It is a two mini blade fuse box off a trials type of bike. I found that the side of this new fuse box had a dovetail groove on it that matched the dovetail on the stock fuse box and so the two are slotted together. I disconnected the single fuse that had been previously fitted for the alarm. One of the new fuses is permanently live for the alarm and the hazard lights (4 way flashers) that I am going to fit and the other switched with the ignition fuse is for the auxiliary socket that I fitted to the headstock neck on the left side and also to feed the electric shut-off valve for the fuel that I fitted. I fitted a new flasher unit as I have replaced the bulbs with LED’s so I don’t have to fit ballast resistors and I fitted another flasher unit for the hazard lights. I tidied up the alarm wires. I refitted the speedo and rev counter. I removed the final drive unit for re-painting and then it started to rain so I called it a day. That could be it if the forecast is right for the rest of this week.

Wednesday – Friday: Nothing done due to the weather and other commitments.

Saturday: I made a mounting plate for the auxiliary switches that I am fitting to the chrome pod that I have bought and drilled it for the switches. I just need to buy a couple of small brackets to fit it to the pod, that’s a job for next week. I then cleaned and rubbed down the rear drive casing and re-sprayed it so that will be ready to go back on when the paint has dried and the rain stopped. That’s it for this week, if I am lucky the polishing and chroming may be ready for collection late next week.

Feb 272010
 

Last week nothing much was done due to heavy rain virtually all week and there was no way I was working in the car port in that. On Tuesday the headlight shell arrived from Big Mike from the VRCC board in the US. To say I am pleased is an understatement, the shell is perfect and looks brand new. I chased the fork re-build and was promised them for Monday. On Saturday I got the drivers backrest back from Dawn after she re-covered it for me and spent about an hour making a template and then fitting the new studs to it to match the rest of the seats. It looks perfect now.

Monday: During the day I just did some cleaning and tidying and also did the diode modification to the indicator warning light to make it brighter recommended by Chet on his web page. In the afternoon I went to collect the forks, only one was completed the second was on the bench. Both promised for Tuesday morning.

Tuesday: In the morning I went and collected the forks all done at last and they cost me 30€ so that was much cheaper than buying the special tool but it did take 7 weeks for him to do them! I then made up a tool for the triple tree bolt. I cut all the steel and took it to a local welder. It will be ready for collection on Wednesday. I rang the chrome platers and polishers and have made an appointment for Thursday to take all the pieces to him.

Wednesday: I collected the triple tree tool and then spent the rest of the day doing other non Valk things. Early evening I loaded the car ready to set off for the chromers in the morning.

Thursday: A friend Eddie came round to go with me to the chromers. It was a good hours drive away on the outskirts of Alicante. We had a little bit of a problem finding the actual location but after driving past twice we eventually found it. He looked at the cam belt cover and said that it would be very expensive to polish and re-chrome it, after stripping some of the peeling chrome away he declared it to be aluminium and that he could polish it and that it would look as good if not better than having it chromed. The estimate for polishing the forks and the cam cover is 55€ and the same for each of the wheels including removing and refitting the tyres. The kick stand will be about 40€ for re-chroming. His estimate for re-chroming the triple exhaust tips , the three windscreen brackets and the front mudguard chrome trim was 250€ and so I decided to not have those done. I have a set of perfect standard exhaust tips, I don’t like windscreens and I can do without the mudguard trim so that will do for now. I may take them back to the UK with me next time that I go and get a price over there as it may be cheaper. He has promised that they will all be ready for collection in a couple of weeks, hopefully it won’t be as long as the forks.


The propstand I hope that it looks better when it comes back.

After a late lunch in the sun with Eddie I found that the VRCC Espana website was down with a corrupt database. I then spent the rest of the afternoon fixing the site and have still to recover the photo gallery if I can.

Friday: The postman delivered a 52mm chrome instrument pod that I bought off eBay that I am going to use to house my auxiliary switches etc. All I need to do now is get some black perspex to block in the front to use as the mounting for the switches etc.

Feb 132010
 

Monday: Pouring with rain today so nothing done.

Tuesday: Spent the morning in the workshop, tidying up and sorting out connectors bolts etc for this afternoons work. I fitted new throttle cables, finished doing the desmog (fitted the capping covers between the exhausts), fitted the electric fuel shut off valve, fitted the replacement carburettor chrome diaphragm covers and replaced the mounting screws with stainless Allen headed bolts. Replaced the camshaft covers with the new polished covers and fitted the pipes to the Progressive air shock absorbers. The pistons finally arrived for the front calliper in to-days post so I can now rebuild the front left calliper.

Thursday: The spotlight brackets for the engine bars arrived yesterday from Kury in the US, brilliant service 6 days from order to delivery. Today I rebuilt the left front calliper and then started cleaning and painting the chipped black paint on the frame and I also painted the inside of the rear mudguard. I gave all these parts two coats of smooth black Hammerite and they now look great. I raised the bike right up in the air so that I could do the painting easily and as a result I found that most of the paint had gone from underneath the final drive housing. It looks like I will have to remove this to repaint it properly. I decided to re-paint the radiator and so I removed it from the bike and then I found that the entire top of the cam belt cover is badly corroded with all the chrome pealing off.  So that is another piece for replating. I keep on finding more that needs doing rather than less.

Friday: Didn’t have much time today so all I did was to clean and respray the radiator.

Saturday: Wet and cold so nothing done.

Sunday: Valentines day so no work allowed taking SWMBO out for lunch.